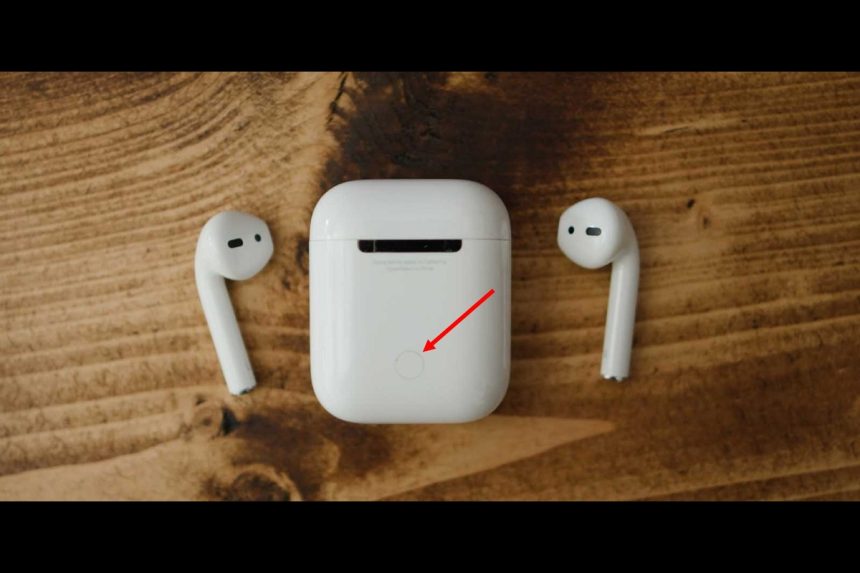
AirPods are a smart wireless headphone option for many people, but if you’re new to using them, you may need help connecting them to your Dell laptop. Our article is here to help you how to connect your AirPods to your Dell laptop easily and quickly, giving you the freedom to experience wireless audio on your computer.
Step 1: Make sure your Dell laptop is compatible with AirPods
Before you begin, ensure your Dell laptop is compatible with AirPods. Since AirPods connect through Bluetooth, your Dell laptop must be equipped with Bluetooth capability. However, if your laptop is an older model, it may not have built-in Bluetooth, in which case you will need to use a Bluetooth adapter.
Step 2: Make sure your AirPods are fully charged
To avoid any issues while connecting your AirPods to your Dell laptop, it is crucial to charge them fully beforehand. Simply place the AirPods inside the charging case and ensure that it is connected to a power source. When the AirPods are finished charging, you will see the LED indicator located on the front of the case change to green, indicating that they are ready for use.
Step 3: Turn on Bluetooth on your Dell laptop
To connect your AirPods to your Dell laptop, the first step is to enable Bluetooth. To do this, navigate to your computer’s settings and select “Devices.” Then, click on the switch next to “Bluetooth” to turn it on.
Step 4: Put your AirPods in pairing mode
To establish a connection between your AirPods and a device, you must first put your AirPods into pairing mode. This is done by following a simple process. Firstly, open the lid of your AirPods case.
To initiate the pairing mode on your AirPods, press and hold down the button situated on the back of the case. Keep holding the button until you observe the LED light on the front of the case begin to flash in a white color.
This will indicate that your AirPods are now in pairing mode and can be connected to a compatible device. By activating the pairing mode, you enable your AirPods to communicate with the device and establish a stable wireless connection, allowing you to enjoy music or make calls with ease.
Step 5: Pair your AirPods with your Dell laptop
After putting your AirPods into pairing mode, you can proceed to connect them to your Dell laptop. Just go to your laptop’s settings and select “Add Bluetooth or another device.” This action will trigger the pairing process. Select “Bluetooth” and wait for your Dell laptop to detect your AirPods. Once your AirPods show up in the list of available devices, click on them to initiate the pairing process with your Dell laptop. This will enable your AirPods to communicate with your Dell laptop wirelessly, and you’ll be able to listen to music, watch videos, or make calls seamlessly.
Step 6: Confirm your AirPods are connected
When your AirPods are successfully paired with your Dell laptop, they will be listed under the “Audio” section in the Bluetooth settings. You can also confirm that your AirPods are connected by checking the volume icon in your taskbar. Click on the icon, and select your AirPods as the output device. This will ensure that the audio from your Dell laptop is played through your AirPods, and you can enjoy an uninterrupted listening experience. By having your AirPods listed under “Audio,” you can easily manage your sound preferences and make adjustments to your audio settings, such as volume or equalizer, based on your personal preferences.
Step 7: Start using your AirPods with your Dell laptop
Congratulations, you’ve successfully connected your AirPods to your Dell laptop! Now you can start enjoying wireless audio on your computer. Insert your AirPods into your ears and begin playing music or any other audio on your Dell laptop.
You should hear the sound through your AirPods automatically.
Tips for using AirPods with your Dell laptop
Here are some suggestions to optimize your use of AirPods when using them with your Dell laptop:
- Ensure your AirPods are always charged: When you’re not using your AirPods, keep them in their charging case so that they stay charged and ready to go.
- Use the AirPods Pro’s noise cancellation feature: If you have AirPods Pro, you can use their noise cancellation feature to block out background noise and focus on your music or other audio.
- Customize your AirPods settings: If you have an iPhone or iPad, you can customize your AirPods settings by going to the “Settings” app and selecting “Bluetooth.” From there, click on the “i” icon next to your Air Pods to access various settings, including the ability to customize the double-tap function, which lets you control what happens when you tap your AirPods twice.
- Keep your AirPods clean: To keep your AirPods working well and looking their best, it’s a good idea to clean them regularly. To keep your AirPods clean and free of debris, you can use a soft, dry cloth to wipe them down. Gently wipe the surface of the AirPods and their charging case to remove any dirt, dust, or smudges. Avoid using any liquids or harsh chemicals, as they could damage the device’s delicate components.
- Use your AirPods with other devices: One of the great things about AirPods is that you can use them with various devices, not just your Dell laptop. For example, you can pair them with your iPhone, iPad, or Apple Watch to enjoy wireless audio on the go.


